This is a two-part lab. The first part introduces the Eclipse debugger and asks you to use it to find the bugs in several sorting and searching subroutines. In the second part, you will measure run times of two sorting algorithms when applied to arrays of different sizes. There is no programming in this lab. You should turn in a report on the results of this lab at the start of next week's lab.
The directory /classes/f07/cs225/Lab_3_files contains the file BuggySearchAndSort.java. Create an Eclipse project, and copy this file into your project.,
BuggySearchAndSort defines a search subroutine that is supposed to check whether or not a given integer occurs in a given array of integers. It also contains three different sorting subroutines that are supposed to be able to sort an array of integers into non-decreasing order. There is also a main program that tests the four subroutines (along with a sorting subroutine from one of Java's standard classes that is there to remind you that you don't necessarily need to write your own subroutines to perform common tasks).
If all the subroutines that are defined in BuggySearchAndSort were correct, then running the program would produce output that looks something like this:
    The array is: 4 3 6 9 3 9 5 4 1 9
    This array DOES contain 5.
    Sorted by Arrays.sort():   1 3 3 4 4 5 6 9 9 9
    Sorted by Sweep Sort:      1 3 3 4 4 5 6 9 9 9
    Sorted by Selection Sort:  1 3 3 4 4 5 6 9 9 9
    Sorted by Insertion Sort:  1 3 3 4 4 5 6 9 9 9
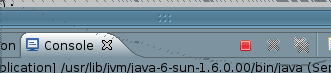
Unfortunately (or fortunately, for the purposes of this lab), each of the four subroutines in BuggySearchAndSort has a bug that can either produce incorrect results or an infinite loop. If you run the buggy program, it will go into an infinite loop. To stop a running program in Eclipse, click the Stop button that looks like a small red square in the part of the window where the Console view appears:
(If this button is gray instead of red, it means that no program is currently running.)
Your job in this lab is to use the Eclipse debugger to find each of the four bugs. In your lab report, you should describe each bug, say how your fixed it, and explain how you used the Eclipse debugger to find the bug.
(Note: It's possible that you could find some or all of the bugs just by inspecting the code. However, the main purpose of this lab is actually to get some experience with the debugger, so I would like you to do that rather than simply eyeball the code.)
To debug a program in Java, you have to start the program using a "Debug" command instead of a "Run" command. There is a "Debug As..." command in the same pop-up menu as the "Run As..." command. You can also click the "Debug" button to debug the program that you have run or debugged most recently. The "Debug" button is just to the left of the "Run" button in the toolbar, and it looks like a bug:
![]()
The main point of the debugger is that it allows you to pause the execution of a program and inspect the values of variables. Once the program has been paused, you can also step through the program line-by-line to see what is going on. The program will not pause, however, unless you have added a breakpoint to the program source code. If you run a program that has no breakpoints under the debugger, it behaves just as it would if it were run normally.
To add a breakpoint, simply double-click in the left margin of the source code,
next to one of the lines of code. (By left margin, I mean the same part of the
window where the error and warning "light bulbs" appear.) The breakpoint appears
as a small dot: ![]() .
You can remove the breakpoint by double-clicking this dot. There is also
a "Remove All Breakpoints" command in the "Run" menu. I should
also note that you can use the "Add Java Exception Breakpoint" command in the
"Run" menu to set up a breakpoint that is triggered whenever an exception of
a given type occurs.
.
You can remove the breakpoint by double-clicking this dot. There is also
a "Remove All Breakpoints" command in the "Run" menu. I should
also note that you can use the "Add Java Exception Breakpoint" command in the
"Run" menu to set up a breakpoint that is triggered whenever an exception of
a given type occurs.
When a program is running in Eclipse under the debugger, and the execution gets to a line that contains a breakpoint, the execution is paused. If Eclipse is showing the regular Java perspective when this happens, Eclipse will want to switch to the Debug perspective. The first time this happens, Eclipse will put up a dialog box that asks whether you want to switch to the Debug perspective. I suggest that you check the box that says "Remember my decision" and say "Yes".
Debugging is complicated, and so is Java's Debug perspective. The most important view is the "Variables" view in the top-right corner. Here, you can inspect the values of variables. An array or object variable has a small triangle next to its name; you can click this triangle to open and close the variable so that you can inspect its contents. The value of a selected variable is also shown at the bottom if the view.
The "Debug" view in the top right contains a list of currently active subroutines. Click on a subroutine to inspect its variables. The title bar of the "Debug" view contains some useful buttons:
![]()
The green triangle means "Resume" and can be used to resume normal execution of the program (until it next encounters a breakpoint). There is a red "Stop" button that can be used to terminate the program. Most important are the three "arrow" buttons for the "Step Into", "Step Over", and "Step Out" commands. "Step Over" is easiest to understand -- clicking it causes one line of code to be executed. "Step In" is similar, except that if the line of code contains a subroutine call, it takes you to the first line of the subroutine so that you can continue from there. "Step Out" continues execution until the current subroutine returns, and it stops at the line to which the subroutine returns. Note that these "Step" commands can also be found in the "Run" menu, and that the F5, F6, and F7 keys can be used as keyboard equivalents for the step commands.
In the left center area of the Debug perspective, you'll find an edit view where the source code files for the program are displayed. The current line is marked in this view with an arrow in the left margin, and you can watch this arrow move as you step through the program. You can even edit your program in the Debug perspective.
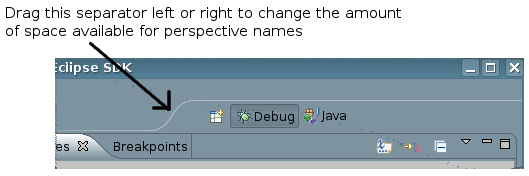
One final remark: There is a list of open perspectives on the right end of the toolbar at the top of the Eclipse window. You can move from one perspective to another by clicking on the name of one of the perspectives in this list. So, when you want to get out of the Debug perspective and back to the normal Java perspective, just click "Java" in the list of perspectives:
For the second part of the lab, you need to run the program xSortLab_closable.jar, which you can find in the directory /classes/f07/cs225/Lab_3_files. (You can run the program out of that directory; you don't need a copy of it. The funny name, BTW, is because this is a modified version of xSortLab.jar, an old Java program that provided no convenient way to end the program. You can terminate xSortLab_closable.jar by clicking the window's close box.)
You might not have time to finish this part of the lab during the lab session, but you should make sure that you know what you are doing before you leave the lab.
The xSortLab program has two parts, a "Visual Sort" mode and a "Timed Sort" mode. Select the mode using the pop-up menu at the top of the window. For this lab, you will use "Timed Sort". (You might want to play with "Visual Sort" which is designed to help the user understand various sorting algorithms -- especially if you have any extra time in the lab.)
Start xSortLab, and switch to the "Timed Sort" mode. Change the "Array Size" to 10000 and hit the "Start Sorting" button at the bottom of the window. The program creates an array of size 10000 filled with random numbers. It sorts that array and tells you how long the computation took. If you try it for the default size, 1000, you'll find that it hardly takes any time at all. The program can't measure short times accurately, so it has the option of using more than one array. For example, if you want to know how long it takes for Bubble Sort to sort an array of length 1000, you can tell the program to create and sort 100 arrays of size 1000; you just have to divide the total computation time by 100, the number of arrays.
There are five different sorting algorithms to choose from. Use the pop-up menu next to the "Start Sorting" button to specify which algorithm you want to use. For this lab, you will mainly investigate two algorithms: Insertion Sort and QuickSort.
For Insertion Sort, use the program to measure the time it takes for Insertion Sort to sort arrays of size 10, 100, 1000, 10000, and 100000. For each of these array sizes, record the time per array. For small array sizes, set the number of arrays to be large enough so that the total computation time is at least a second. Since there is some random variation in the run times, you might want to do a couple of trials to get a more accurate average run time for each size.
For QuickSort, use the program to measure the time it takes for QuickSort to sort arrays of size 100, 1000, 10000, 100000, 1000000, and 10000000. (The last number is ten million.)
In your lab report, compare the data for the two algorithms and answer the following questions: Based on your data for Insertion Sort, how long do you predict it would take for Insertion Sort to sort an array of size ten million? Based on your data for QuickSort, how long do you predict it would take for Quicksort to sort an array of size one billion? Don't just make a guess! Examine the patterns in the data. Explain your reasoning.